


TI 内置推理框架 tiinfer 介绍
高性能的 HTTP 服务
自由编排计算过程
安装
tiinfer 支持 Gnu/Linux 系统,依赖 python 3.8 及以上版本。需要使用以下命令安装 PyPI 包:
pip install -i https://mirrors.cloud.tencent.com/pypi/simple tiinfer
HelloWorld!
以下代码展示了一个最简单的 HelloWorld 示例:
from typing import Dictimport tiinfer?### 日志相关代码 #### 增加以下代码,才能将框架记录的请求日志打印到终端import loggingimport syslogger_formatter = "%(asctime)s %(levelname)s ? ?%(module)s:%(lineno)d ? ?%(message)s"logging.basicConfig(stream=sys.stdout, format=logger_formatter, level=logging.DEBUG)### 日志相关代码 ###?# tiinfer支持原生的mosec.Workerclass HelloWorld(mosec.Worker):? ? def forward(self, req: Dict) -> Dict:? ? ? ? return {"hello": f"world. raw req is {req}"}?# 启动两个进程同时处理请求tiinfer.append_worker(HelloWorld, num=2)
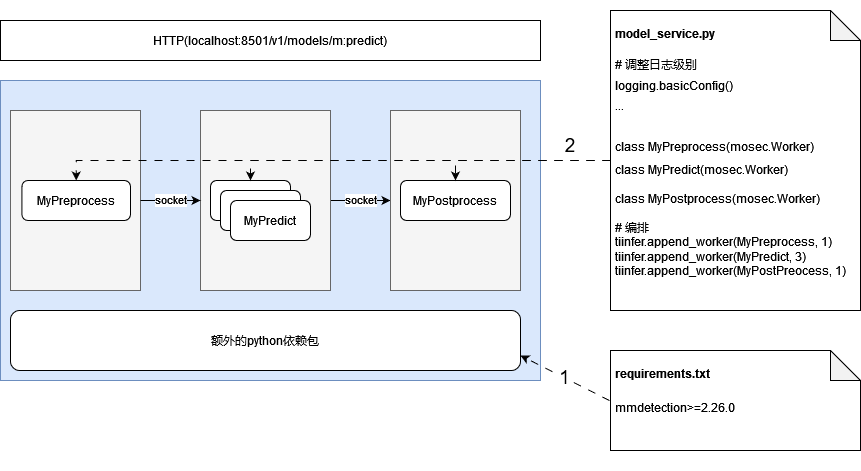
将上述代码保存为 model_service.py 文件。执行以下命令可以拉起整个推理服务:
TI_MODEL_DIR=`pwd` python3 -m tiinfer --timeout 30000
模型拉起后,会在8501端口启动一个 HTTP 服务,请求地址为
/v1/models/m:predict。用以下命令可以访问:> curl -X POST -d '{"key": "values"}' http://127.0.0.1:8501/v1/models/m:predict{"hello": "world. raw is {'key': 'values'}"}
tiinfer的架构
?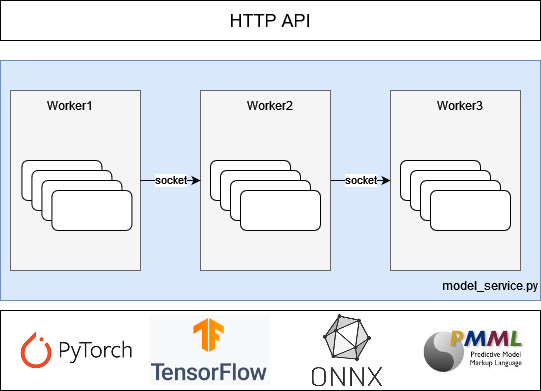
为了降低模型的上线难度,平台提供的 tiinfer 镜像已经打包了诸多流行的推理引擎,会读取客户提供的 model_service.py 文件,自动拉起 HTTP 服务。具体的服务启动过程如下所示:
1. 使用 pip 安装 requirements.txt 文件中填写的 python 依赖
2. 读取 model_service.py 并实例化几个处理过程的进程
3. 启动 HTTP 服务
?
自定义推理Worker
1. 可选:覆写
__init__函数,进行一些初始化工作。只在必要的时候覆写,注意必须先调用super.__init__()以完成父类初始化。2. 必须:自定义 forward 函数,提供处理能力。通常在 forward 中完成数据的处理工作。
class Worker:def __init__(self)def forward(data)
在完成定义推理 Worker 后,需要调用
tiinfer.append_worker()函数来进行编排:def append_worker(? ? worker: Type[mosec.Worker],? ? num: int = 1,? ? start_method: str = "spawn",? ? env: Union[None, List[Dict[str, str]]] = None,) -> None"""worker: 继承mosec.Worker并实现了forward方法的处理Workernum: 并行计算的进程数(>=1)start_method: 进程启动方法("spawn" 或 "fork")env: 进程启动前的一些环境变量"""
完整的推理过程中,一般需要对输入进行预处理,再输入到模型进行推理,并对推理结果进行后处理,最终才返回给调用方。推理过程通常是在 GPU 上完成的,而预处理、后处理往往是 CPU 计算甚至是一些 IO 处理。如果将预处理、后处理同推理放在同一个进程中处理,启动的进程数目主要受限于 GPU 的显存及算力。此时,将预处理、后处理同推理进程剥离,能够充分利用 CPU 的处理能力,参考以下代码片段:
import tiinferfrom mosec import Workerfrom typing import Dict, Any??class MyPreprocess(Worker):def forward(self, data: Dict) -> Any:# 输入是json转化来的Dict,进行一些必要的预处理?class MyPredict(Worker):def __int__(self):super.__init__()# 读取并加载模型def forward(self, data: Any) -> Any:# 输入是预处理的结果,通过调用模型推理后,得到推理结果??class MyPostprocess(Worker):def forward(self, data: Any) -> Dict:# 输入为推理结果,通过一些后处理手段转化为Dict作为Json返回给调用方?# 编排处理过程: 1x预处理Worker -> 2x推理Worker -> 1x后处理Workertiinfer.append_worker(MyPreprocess, 1)tiinfer.append_worker(MyPredict, 2)tiinfer.append_worker(MyPostprocess, 1)
model_service.py 简介
对 model_service.py 的要求
参考上文 tiinfer 介绍中的相关章节。
分类模型推理脚本 Pytorch 实现示例
?import loggingimport osimport timefrom typing import Dict, Listfrom urllib.request import urlretrieve?import cv2 ?# type: ignoreimport numpy as np ?# type: ignore?import torch ?# type: ignore?import tiinferimport tiinfer.utilsimport mosec??### 日志相关代码 #### 增加以下代码,才能将框架记录的请求日志打印到终端logger = logging.getLogger()logger.setLevel(logging.DEBUG)formatter = logging.Formatter(? ? "%(asctime)s - %(process)d - %(levelname)s - %(filename)s:%(lineno)s - %(message)s")sh = logging.StreamHandler()sh.setFormatter(formatter)logger.addHandler(sh)### 日志相关代码 ###?# 预处理过程对输入的base64字符串进行解码,并按照模型要求做一些缩放操作class Pre(mosec.Worker):? ? def forward(self, req: Dict) -> cv2.Mat:? ? ? ? # 预处理的输入数据是json转化而来的Dict? ? ? ? img_base64_bytes = req["image"]? ? ? ? img = tiinfer.utils.image_to_cv2_mat(img_base64_bytes)? ? ? ? # bgr -> rgb? ? ? ? img = img[:, :, ::-1]? ? ? ? # 对图片做一些预处理? ? ? ? img = cv2.resize(img, (256, 256))? ? ? ? crop_img = (? ? ? ? ? ? img[16 : 16 + 224, 16 : 16 + 224].astype(np.float32) / 255? ? ? ? ) ?# center crop? ? ? ? crop_img -= [0.485, 0.456, 0.406]? ? ? ? crop_img /= [0.229, 0.224, 0.225]? ? ? ? crop_img = np.transpose(crop_img, (2, 0, 1))? ? ? ? return crop_img?# 加载模型,并对预处理后的结果做推理操作,并转换为最终结果传给调用方·class Infer(mosec.Worker):? ? def __init__(self) -> None:? ? ? ? super().__init__()? ? ? ? # 获取当前所在目录,需要据此加载模型? ? ? ? self.root_path = tiinfer.TI_MODEL_DIR# 优先使用GPUself.device = (? ? ? ? ? ? torch.device("cuda") if torch.cuda.is_available() else torch.device("cpu")? ? ? ? )### 非加速模型的加载 开始###? ? ? ? # 模型存在model目录下面? ? ? ? model_file = os.path.join(self.root_path, "model/resNet50.pt")? ? ? ? ### 非加速模型的加载 结束###### 加速模型的加载 开始#### #加速模型需要额外导入tiacc_inference# import tiacc_inference# model_file = os.path.join(self.root_path, "model/tiacc.pt")### 加速模型的加载 结束###? ? ? ? # 加载模型? ? ? ? self.model = torch.jit.load(model_file)? ? ? ? self.model.eval()?? ? ? ? # 分类需要知道最终的类别? ? ? ? self.categories = load_categories()?? ? def forward(self, img: cv2.Mat) -> Dict:? ? ? ? with torch.no_grad():? ? ? ? ? ? batch = torch.stack(? ? ? ? ? ? ? ? [torch.tensor(arr, device=self.device) for arr in [img]]? ? ? ? ? ? )? ? ? ? ? ? pred_results = self.model(batch)? ? ? ? ? ? prob = torch.nn.functional.softmax(pred_results, dim=1)? ? ? ? ? ? top1_prob, top1_catid = torch.topk(prob, 1)? ? ? ? ? ? return [? ? ? ? ? ? ? ? {? ? ? ? ? ? ? ? ? ? "confidence": top1_prob[i].tolist()[0],? ? ? ? ? ? ? ? ? ? "pred": self.categories[top1_catid[i].tolist()[0]],? ? ? ? ? ? ? ? }? ? ? ? ? ? ? ? for i in range(top1_prob.size(0))? ? ? ? ? ? ][0]??# 从标签文件中读取标签id对应的类别信息def load_categories() -> List[str]:? ? logging.info("loading categories file...")? ? local_filename = "imagenet_classes.txt"? ? if not os.path.exists("imagenet_classes.txt"):? ? ? ? local_filename, _ = urlretrieve(? ? ? ? ? ? "https://raw.githubusercontent.com/pytorch/hub/master/imagenet_classes.txt"? ? ? ? )? ? with open(local_filename, encoding="utf8") as file:? ? ? ? return list(map(lambda x: x.strip(), file.readlines()))?# 编排处理过程:2个进程进行预处理 -> 1个进程进行推理tiinfer.append_worker(Pre, 2)tiinfer.append_worker(Infer, 1)
Demo 下载
平台提供了针对各类模型的 Demo,下载地址详见下表:
TI-ACC 推理加速函数介绍
tiacc_inference.load()
TI-ONE 的 Detectron2 或者 MMDetection 格式优化后的模型,需要使用 tiacc-inference.load() 函数对模型进行加载,其他格式无需使用tiacc_inference 的 load,使用原生格式 load 即可。
MMDetection
原生示例:
from mmdet.apis import init_detectormodel = init_detector(config, checkpoint, device=device)
优化后使用示例:
import tiacc_inferencemodel = tiacc_inference.load('tiacc.pt') #tiacc.pt是模型优化后生成的新模型
Detectro2(对于 Detectron2 导出的 PyTorch 模型)
原生示例:
import torchmodel = torch.load(checkpoint) #.pth模型文件
优化后使用示例:
import tiacc_inferencemodel = tiacc_inference.load('tiacc.pt') #tiacc.pt是模型优化后生成的新模型
Detectro2(对于通过 Detectron2.modeling.build_model 构造的模型)
原生示例:
from detectron2.config import get_cfgfrom detectron2.modeling import build_modelcfg = get_cfg()cfg.MODEL.DEVICE = devicecfg.MODEL.WEIGHTS = checkpointmodel = build_model(cfg)
优化后使用示例:
import tiacc_inferencemodel = tiacc_inference.load('tiacc.pt') #tiacc.pt是模型优化后生成的新模型
?

