


步骤1:下载并添加配置文件
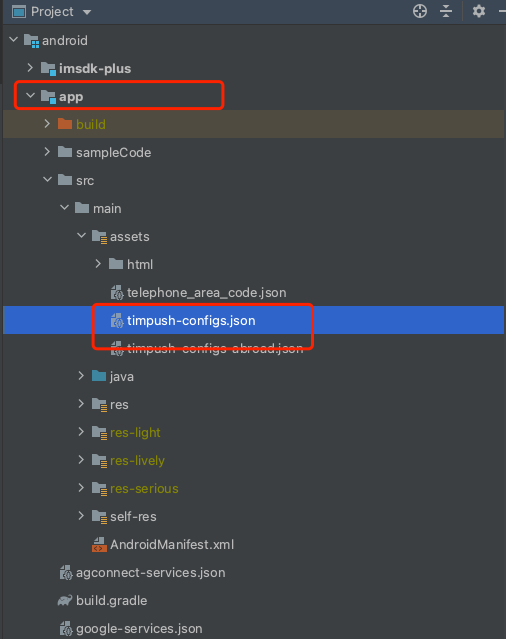
完成控制台厂商推送信息填写后,下载并添加配置文件到工程。将下载的 timpush-configs.json 文件添加到应用模块的 assets 目录下:
1.选择下载配置文件 timpush-configs.json | 2.添加到工程 |
?  | ?  |
步骤2:集成 TIMPush 插件
// 推送主包必须要集成implementation 'com.tencent.timpush:timpush:7.9.5668'// 按照需要集成对应厂商implementation 'com.tencent.timpush:huawei:7.9.5668'implementation 'com.tencent.timpush:xiaomi:7.9.5668'implementation 'com.tencent.timpush:oppo:7.9.5668'implementation 'com.tencent.timpush:vivo:7.9.5668'implementation 'com.tencent.timpush:honor:7.9.5668'implementation 'com.tencent.timpush:meizu:7.9.5668'implementation 'com.tencent.timpush:fcm:7.9.5668'
说明:
1. TIMPush 需要集成 IMSDK 在 7.6.5011 版本及以上。
2. 无 UI 或者没有集成其他插件的用户,需要增加集成 TUICore,支持源码和 Maven 集成,方式如下:
def projects = this.rootProject.getAllprojects().stream().map { project -> project.name }.collect()
api projects.contains("tuicore") ? project(':tuicore') : "com.tencent.liteav.tuikit:tuicore:7.9.5666"
vivo 和荣耀配置
根据 vivo 和荣耀厂商接入指引,需要将 APPID 和 APPKEY 添加到清单文件中,否则会出现编译问题。
android {...defaultConfig {...manifestPlaceholders = ["VIVO_APPKEY" : "您应用分配的证书 APPKEY","VIVO_APPID" : "您应用分配的证书 APPID","HONOR_APPID" : "您应用分配的证书 APPID"]}}
// vivo begin<meta-data tools:replace="android:value"android:name="com.vivo.push.api_key"android:value="您应用分配的证书 APPKEY" /><meta-data tools:replace="android:value"android:name="com.vivo.push.app_id"android:value="您应用分配的证书 APPID" />// vivo end?// honor begin<meta-data tools:replace="android:value"android:name="com.hihonor.push.app_id"android:value="您应用分配的证书 APPID" />// honor end
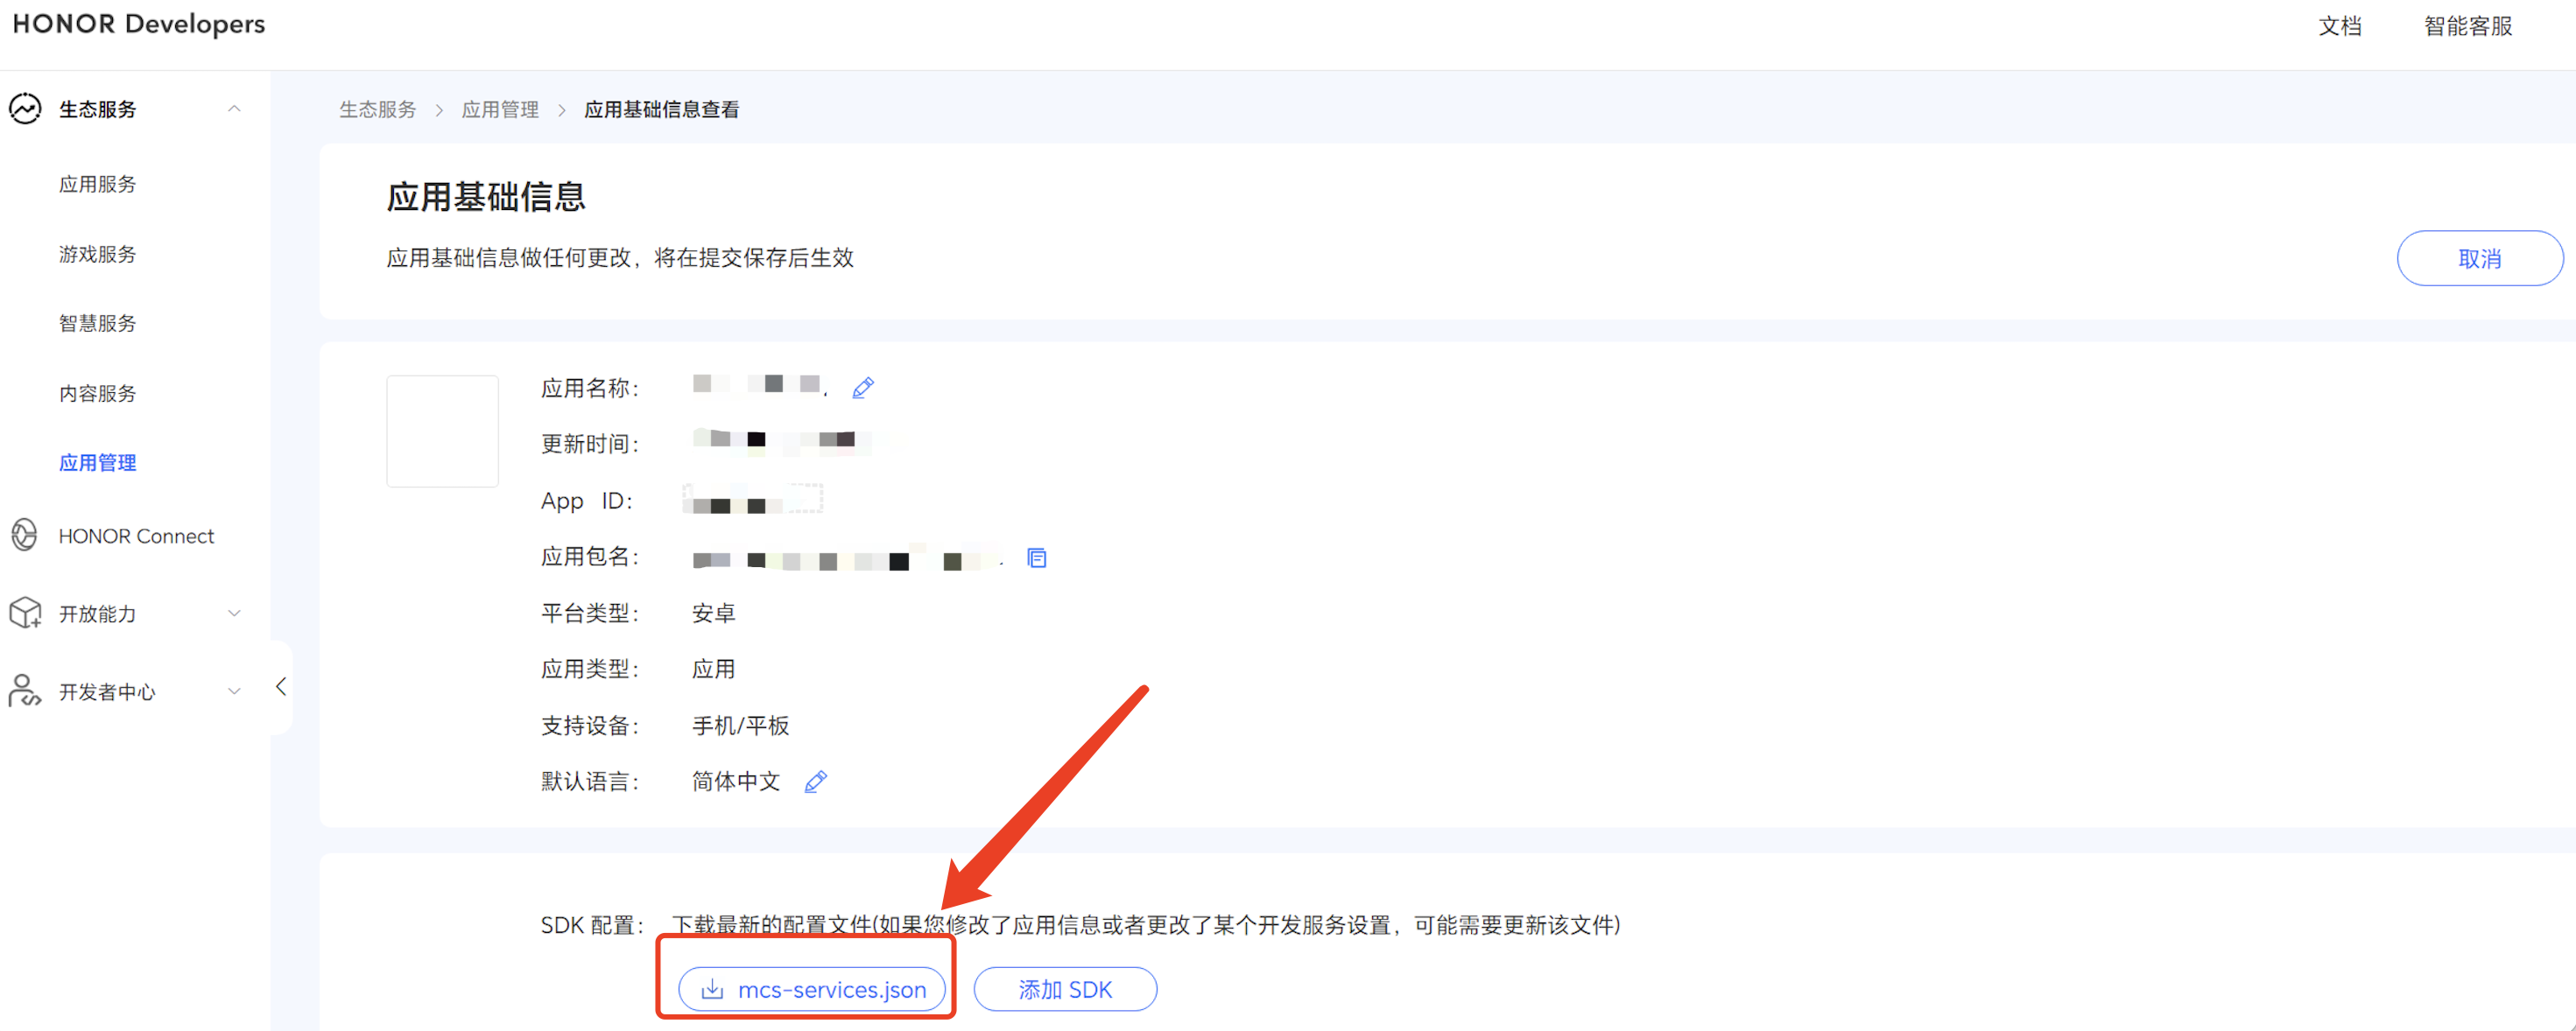
华为、荣耀和 Google FCM 适配
按照厂商方法,集成对应的 plugin 和 json 配置文件。
注意:
以下荣耀的适配仅 7.7.5283 及以上版本需要配置。
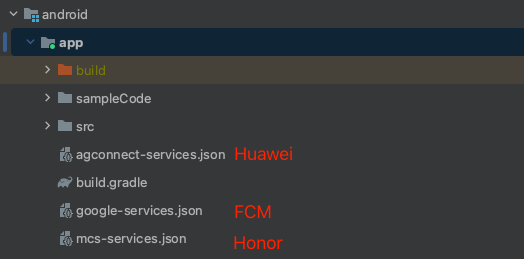
1.1 下载配置文件添加到工程根目录:
?
?
?
?
1.2 在项目级 build.gradle 文件中 buildscript -> dependencies 下添加以下配置:
在项目级 build.gradle 文件中 buildscript -> dependencies 下添加以下配置:
buildscript {dependencies {...classpath 'com.google.gms:google-services:4.3.15'classpath 'com.huawei.agconnect:agcp:1.4.1.300'classpath 'com.hihonor.mcs:asplugin:2.0.1.300'}}
在项目级 settings.gradle 文件中 pluginManagement -> repositories 和 dependencyResolutionManagement -> repositories 下添加以下仓库配置:
pluginManagement {repositories {gradlePluginPortal() mavenCentral() maven { url "https://mirrors.tencent.com/nexus/repository/maven-public/" } // 配置HMS Core SDK的Maven仓地址。 maven {url 'https://developer.huawei.com/repo/'} maven {url 'https://developer.hihonor.com/repo'}}}dependencyResolutionManagement {...repositories {mavenCentral() maven { url "https://mirrors.tencent.com/nexus/repository/maven-public/" } // 配置HMS Core SDK的Maven仓地址。 maven {url 'https://developer.huawei.com/repo/'} maven {url 'https://developer.hihonor.com/repo'}}}}
在项目级 build.gradle 文件中 buildscript 下添加以下配置:
buildscript {repositories {mavenCentral() maven { url "https://mirrors.tencent.com/nexus/repository/maven-public/" } // 配置HMS Core SDK的Maven仓地址。 maven {url 'https://developer.huawei.com/repo/'} maven {url 'https://developer.hihonor.com/repo'}}dependencies {...classpath 'com.google.gms:google-services:4.3.15'classpath 'com.huawei.agconnect:agcp:1.4.1.300'classpath 'com.hihonor.mcs:asplugin:2.0.1.300'}}
在项目级 settings.gradle 文件中 dependencyResolutionManagement -> repositories 下添加以下仓库配置:
dependencyResolutionManagement {...repositories {mavenCentral() maven { url "https://mirrors.tencent.com/nexus/repository/maven-public/" } // 配置HMS Core SDK的Maven仓地址。 maven {url 'https://developer.huawei.com/repo/'} maven {url 'https://developer.hihonor.com/repo'}}}
在项目级 build.gradle 文件中 buildscript 和 allprojects 下添加以下配置:
buildscript {repositories {mavenCentral() maven { url "https://mirrors.tencent.com/nexus/repository/maven-public/" } // 配置HMS Core SDK的Maven仓地址。 maven {url 'https://developer.huawei.com/repo/'} maven {url 'https://developer.hihonor.com/repo'}}dependencies {...classpath 'com.google.gms:google-services:4.3.15'classpath 'com.huawei.agconnect:agcp:1.4.1.300'classpath 'com.hihonor.mcs:asplugin:2.0.1.300'}}?allprojects {repositories {mavenCentral() maven { url "https://mirrors.tencent.com/nexus/repository/maven-public/" } // 配置HMS Core SDK的Maven仓地址。 maven {url 'https://developer.huawei.com/repo/'} maven {url 'https://developer.hihonor.com/repo'}}}
?
1.3 在应用级 build.gradle 文件中添加下方配置:
apply plugin: 'com.google.gms.google-services'apply plugin: 'com.huawei.agconnect'apply plugin: 'com.hihonor.mcs.asplugin'
以上步骤完成后,就可以收到离线推送通知了。
注意:
如果您想尽可能简单地接入 TIMPush 组件,您需要使用 TUICore 组件中的 TUILogin 提供的 login/logout 接口登录/登出,此时 TIMPush 组件会自动感知登录/登出事件。如果您不想使用 TUILogin 提供的接口,您需要在完成登录/登出操作后,手动调用 TIMPushManager 的接口 registerPush/unRegisterPush。
步骤3:设置混淆规则
在 proguard-rules.pro 文件,将 TIMPush 相关类加入不混淆名单:
-keep class com.tencent.qcloud.** { *; }-keep class com.tencent.timpush.** { *; }
步骤4:消息触达统计配置
如果您需要统计触达数据,请按照如下完成配置:
?
回执地址:
https://api.im.qcloud.com/v3/offline_push_report/huawei注意:
华为推送证书 ID <= 11344 ,使用华为推送 v2 版本接口,不支持触达和点击回执,请重新生成更新证书 ID 。
?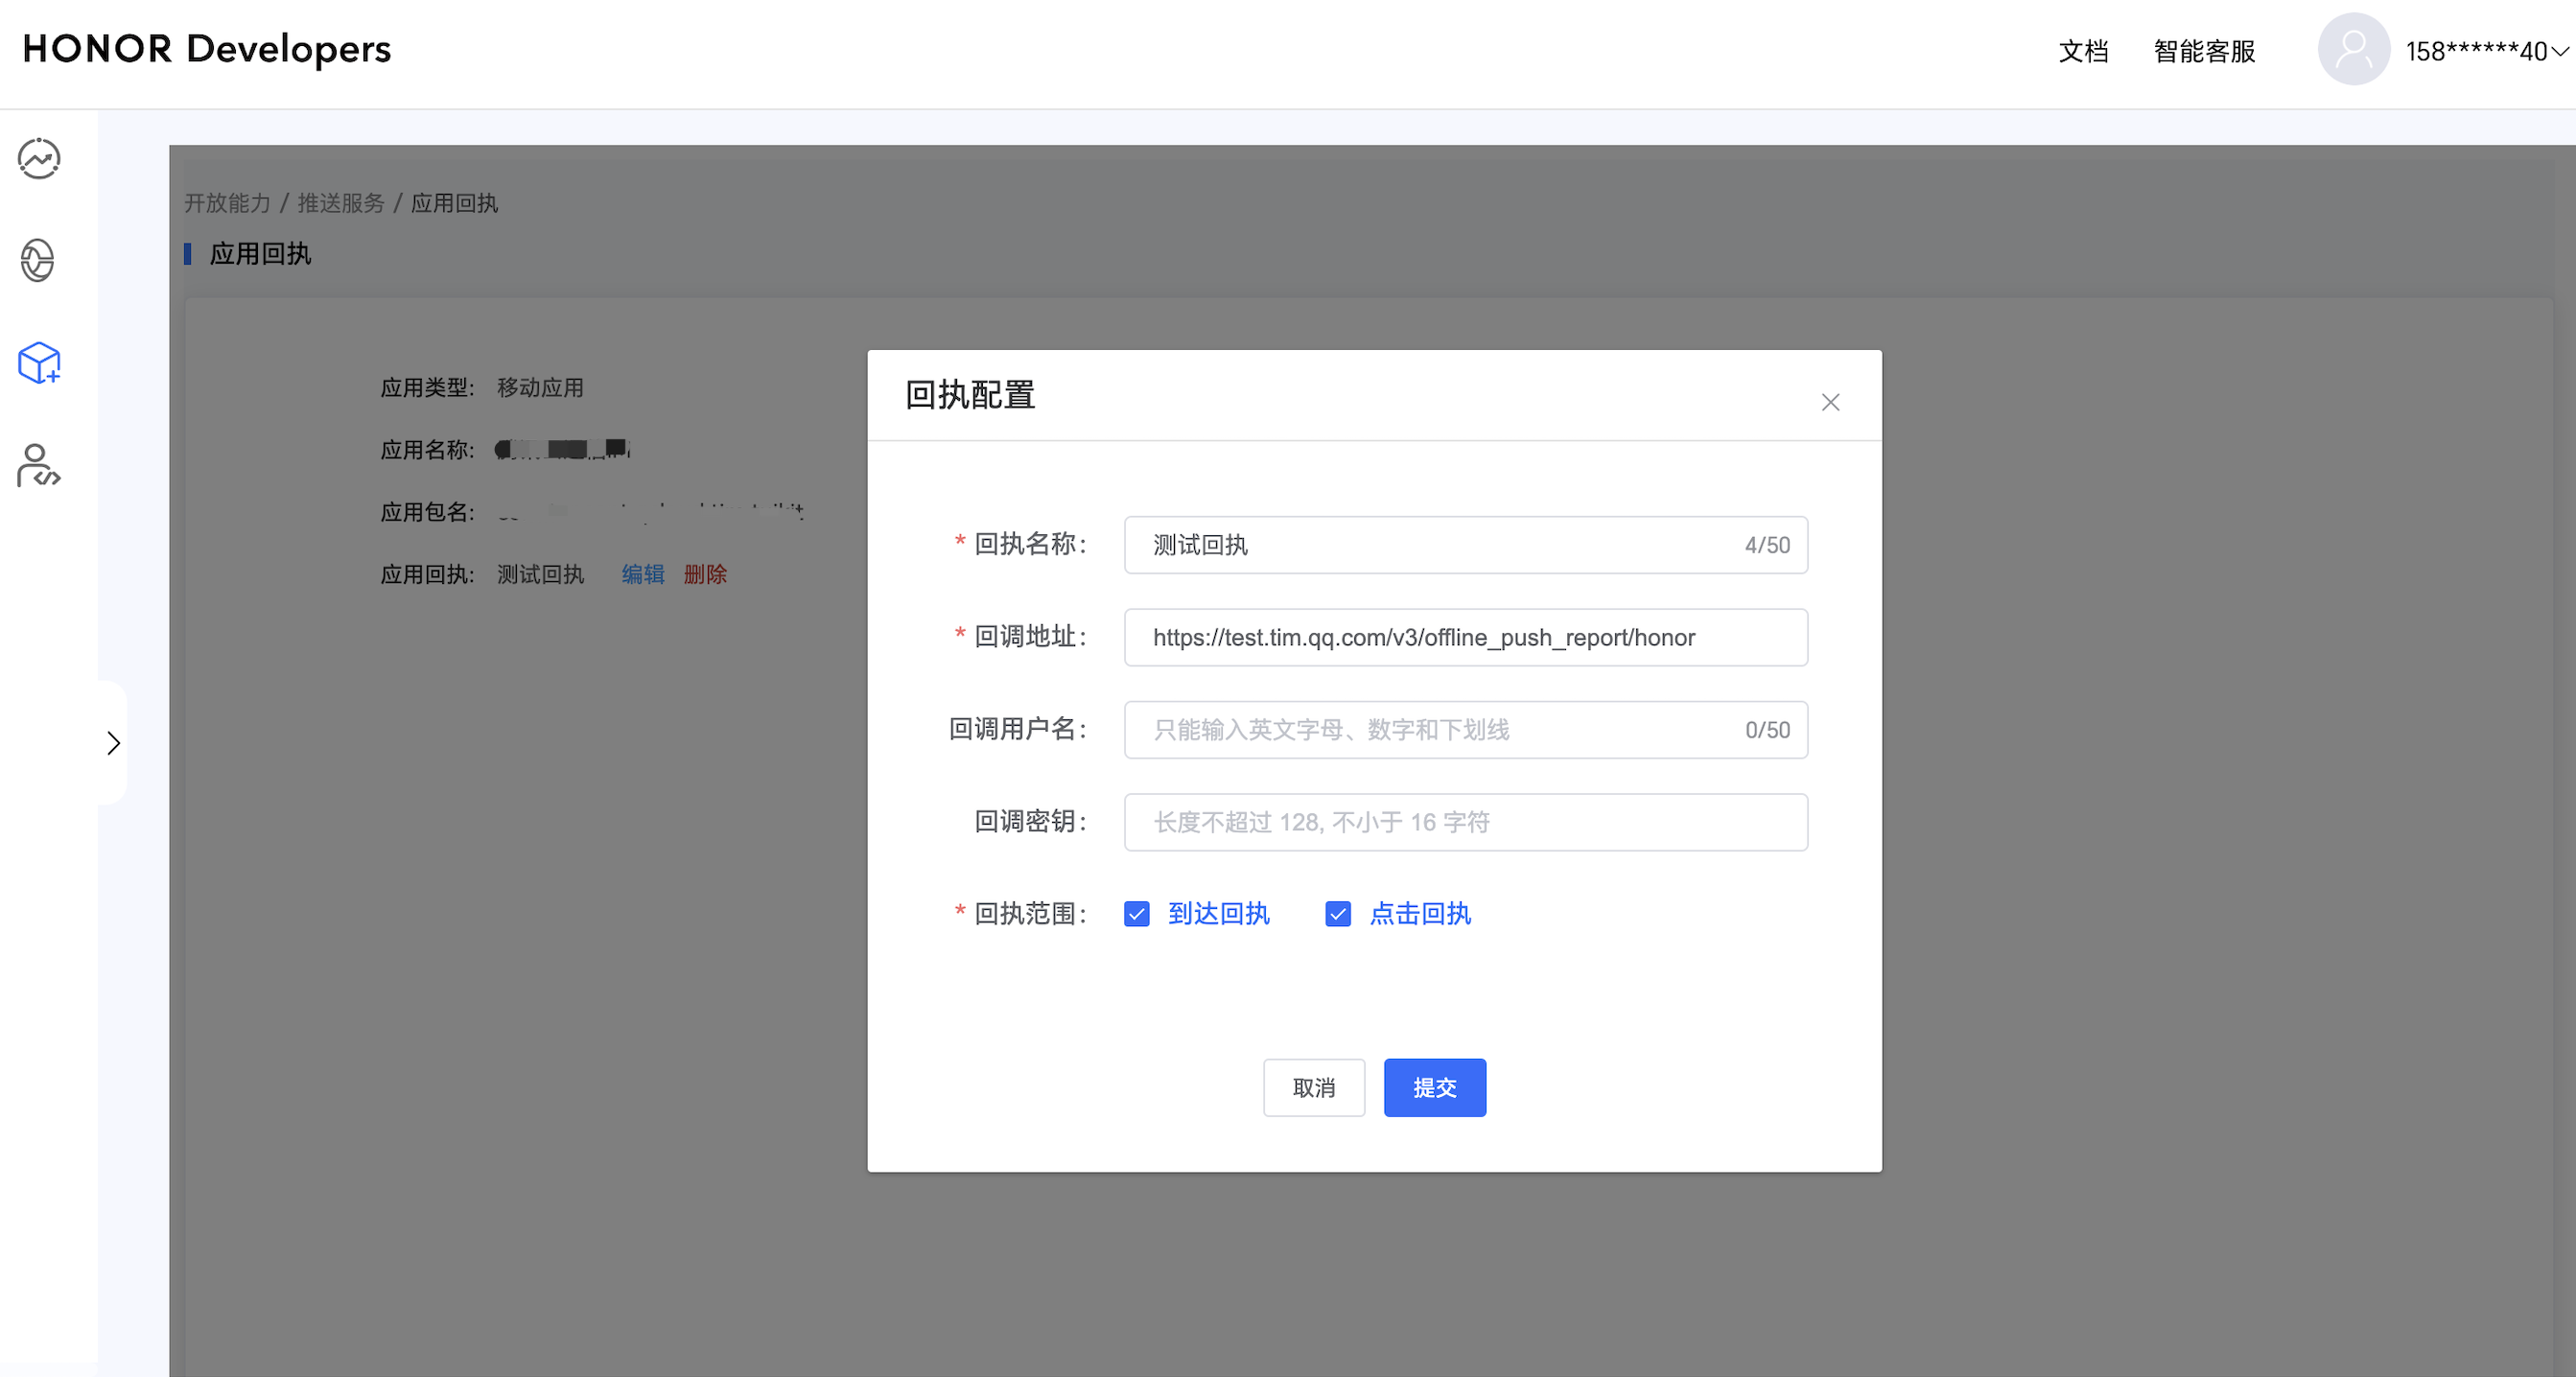
回执地址:
https://api.im.qcloud.com/v3/offline_push_report/honor回调地址配置 | 回执 ID 配置 IM 控制台 |
? 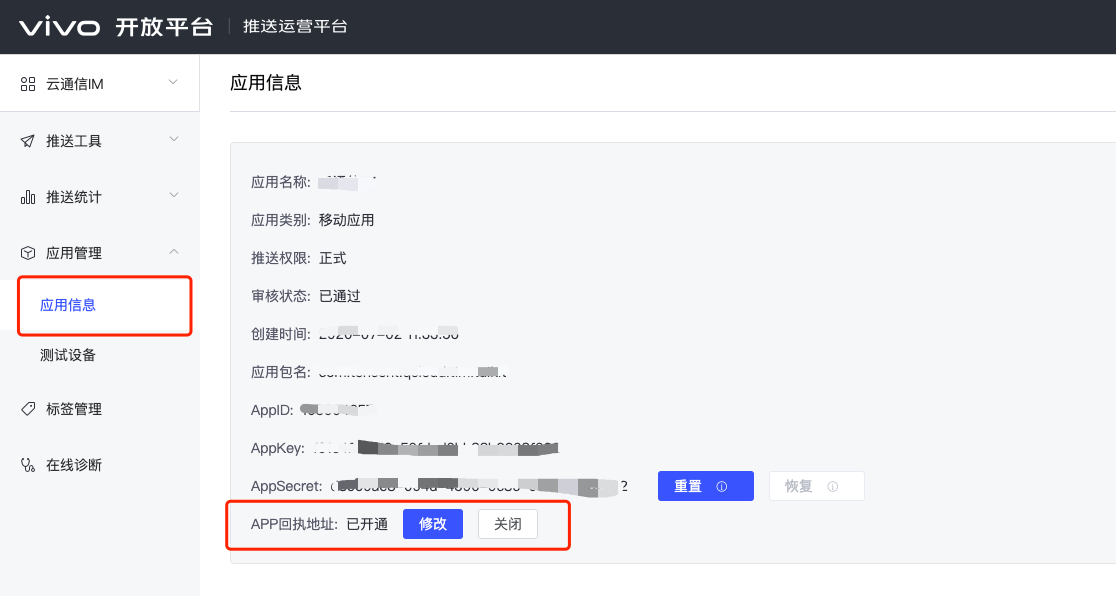 回执地址: https://api.im.qcloud.com/v3/offline_push_report/vivo | ? 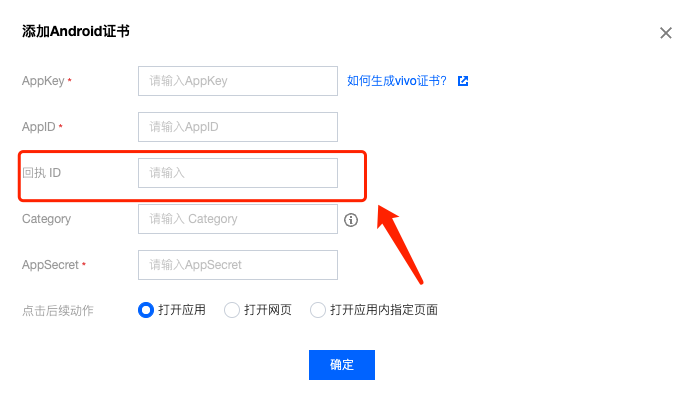 |
打开回执开关 | 配置回执地址 |
?  | ? 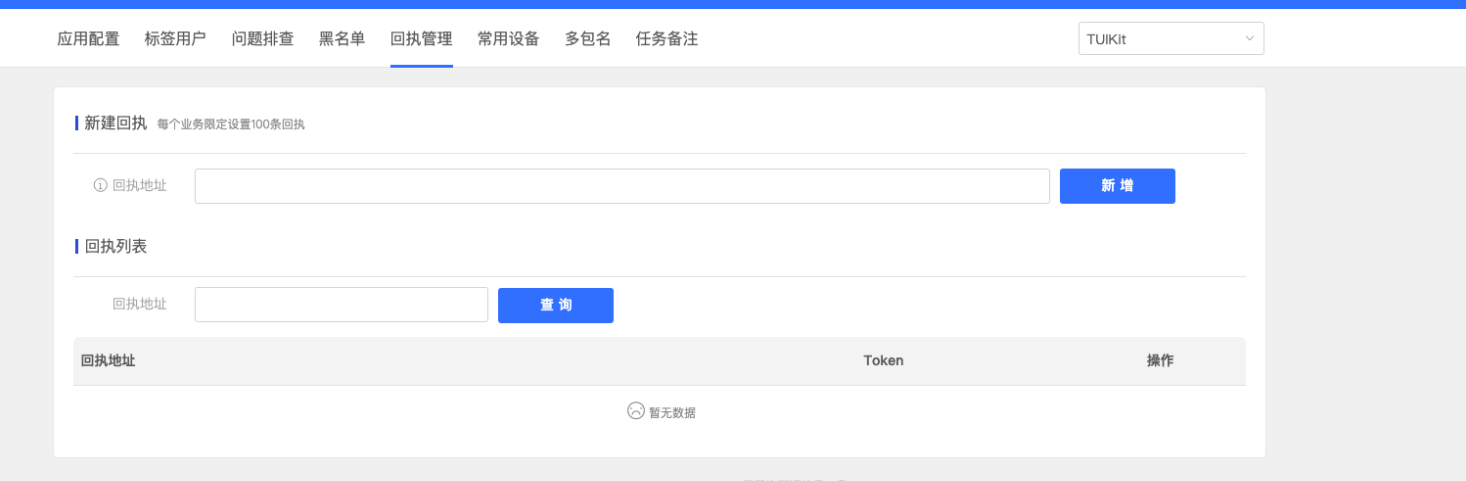 |
回执地址:
https://api.im.qcloud.com/v3/offline_push_report/meizu注意:
打开回执开关后,请务必确保回执地址正确配置。不配置或者配置地址错误,都会影响推送功能。
说明:
其他支持厂商无需进行消息触达统计配置。
FCM 暂不支持推送统计功能。
步骤5:发消息时设置离线推送参数
调用?sendMessage?发送消息时,您可以通过 V2TIMOfflinePushInfo 设置离线推送参数。调用?V2TIMOfflinePushInfo?的setExt 设置自定义 ext 数据,当用户收到离线推送启动 App 的时候,可以在单击通知跳转的回调中获取到?ext?字段,然后根据?ext?字段内容跳转到指定的 UI 界面。可以参见?ChatProvider?的 sendMessage() 方法:
V2TIMOfflinePushInfo v2TIMOfflinePushInfo = new V2TIMOfflinePushInfo();v2TIMOfflinePushInfo.setTitle("推送标题");v2TIMOfflinePushInfo.setDesc("推送内容");?OfflinePushExtInfo offlinePushExtInfo = new OfflinePushExtInfo(); offlinePushExtInfo.getBusinessInfo().setSenderId("senderID");offlinePushExtInfo.getBusinessInfo().setSenderNickName("senderNickName"); if (chatInfo.getType() == V2TIMConversation.V2TIM_GROUP) { offlinePushExtInfo.getBusinessInfo().setChatType(V2TIMConversation.V2TIM_GROUP); offlinePushExtInfo.getBusinessInfo().setSenderId("groupID"); } v2TIMOfflinePushInfo.setExt(new Gson().toJson(offlinePushExtInfo).getBytes());?// OPPO必须设置ChannelID才可以收到推送消息,这个channelID需要和控制台一致v2TIMOfflinePushInfo.setAndroidOPPOChannelID("tuikit");v2TIMOfflinePushInfo.setAndroidHuaWeiCategory("IM");v2TIMOfflinePushInfo.setAndroidVIVOCategory("IM");?final V2TIMMessage v2TIMMessage = message.getTimMessage();String msgID = V2TIMManager.getMessageManager().sendMessage(v2TIMMessage, isGroup ? null : userID, isGroup ? groupID : null,V2TIMMessage.V2TIM_PRIORITY_DEFAULT, false, v2TIMOfflinePushInfo, new V2TIMSendCallback<V2TIMMessage>() {@Overridepublic void onProgress(int progress) {?}?@Overridepublic void onError(int code, String desc) {TUIChatUtils.callbackOnError(callBack, TAG, code, desc);}?@Overridepublic void onSuccess(V2TIMMessage v2TIMMessage) {TUIChatLog.v(TAG, "sendMessage onSuccess:" + v2TIMMessage.getMsgID());message.setMsgTime(v2TIMMessage.getTimestamp());TUIChatUtils.callbackOnSuccess(callBack, message);}});
步骤6:解析离线推送消息
当收到推送时候,点击通知栏的点击事件,组件会以回调或者广播形式通知应用,应用在回调中配置 App 的跳转页面即可。注册回调时机建议放在应用 Application 的 oncreate() 函数中。
回调方式如下:
TUICore.registerEvent(TUIConstants.TIMPush.EVENT_NOTIFY, TUIConstants.TIMPush.EVENT_NOTIFY_NOTIFICATION, new ITUINotification() {@Overridepublic void onNotifyEvent(String key, String subKey, Map<String, Object> param) {Log.d(TAG, "onNotifyEvent key = " + key + "subKey = " + subKey);if (TUIConstants.TIMPush.EVENT_NOTIFY.equals(key)) {if (TUIConstants.TIMPush.EVENT_NOTIFY_NOTIFICATION.equals(subKey)) {if (param != null) {String extString = (String)param.get(TUIConstants.TIMPush.NOTIFICATION_EXT_KEY);// 获取 ext 自定义跳转// 示例:跳转到对应聊天界面OfflinePushExtInfo offlinePushExtInfo = null;try {offlinePushExtInfo = new Gson().fromJson(extString, OfflinePushExtInfo.class);if (offlinePushExtInfo.getBusinessInfo().getChatAction() == OfflinePushExtInfo.REDIRECT_ACTION_CHAT) {String senderId = offlinePushExtInfo.getBusinessInfo().getSenderId();if (TextUtils.isEmpty(senderId)) {return;}TUIUtils.startChat(senderId, offlinePushExtInfo.getBusinessInfo().getSenderNickName(), offlinePushExtInfo.getBusinessInfo().getChatType());}} catch (Exception e) {Log.e(TAG, "getOfflinePushExtInfo e: " + e);}}}}}});
广播方式如下:
// 动态注册广播IntentFilter intentFilter = new IntentFilter();intentFilter.addAction(TUIConstants.TIMPush.NOTIFICATION_BROADCAST_ACTION);LocalBroadcastManager.getInstance(context).registerReceiver(localReceiver, intentFilter);?//广播接收者public class OfflinePushLocalReceiver extends BroadcastReceiver {public static final String TAG = OfflinePushLocalReceiver.class.getSimpleName();?@Overridepublic void onReceive(Context context, Intent intent) {DemoLog.d(TAG, "BROADCAST_PUSH_RECEIVER intent = " + intent);if (intent != null) {String ext = intent.getStringExtra(TUIConstants.TIMPush.NOTIFICATION_EXT_KEY);// 获取 ext 自定义跳转// 示例:跳转到对应聊天界面OfflinePushExtInfo offlinePushExtInfo = null;try {offlinePushExtInfo = new Gson().fromJson(extString, OfflinePushExtInfo.class);if (offlinePushExtInfo.getBusinessInfo().getChatAction() == OfflinePushExtInfo.REDIRECT_ACTION_CHAT) {String senderId = offlinePushExtInfo.getBusinessInfo().getSenderId();if (TextUtils.isEmpty(senderId)) {return;}TUIUtils.startChat(senderId, offlinePushExtInfo.getBusinessInfo().getSenderNickName(), offlinePushExtInfo.getBusinessInfo().getChatType());}} catch (Exception e) {Log.e(TAG, "getOfflinePushExtInfo e: " + e);}} else {Log.e(TAG, "onReceive ext is null");}}}
?

